If you’re planning a Toy Story-themed birthday party, there’s no better way to celebrate than with a themed cake topped with edible cowboy hats! In this article, we’ll walk you through step-by-step instructions for making these hats and incorporating them into a cake design that’ll make any Toy Story fan’s day. So let’s get started!
Introduction to Toy Story-themed cakes
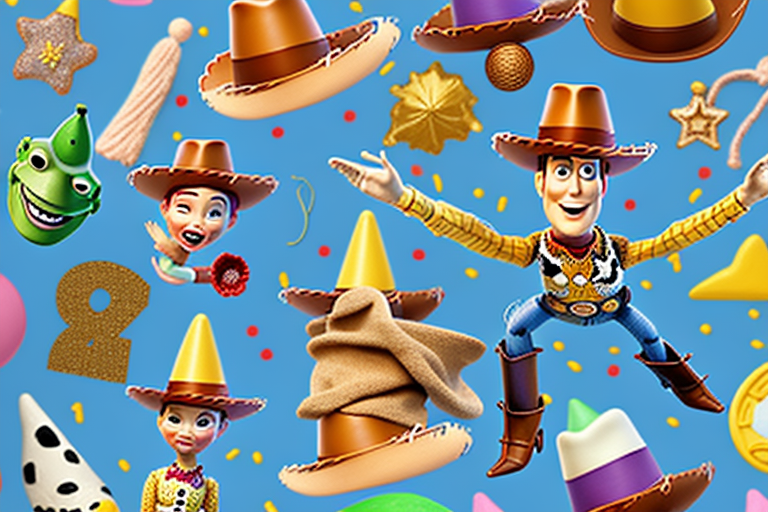
Cakes are an essential part of any celebration, especially birthdays. And if you’re throwing a Toy Story-themed party, it’s only fitting to have a cake that ties in with the theme. You can incorporate the characters, colors, and motifs from the beloved movie franchise into your cake design for a fun and festive celebration. One way to add a unique touch to your cake is with edible cowboy hats- a nod to Sheriff Woody’s iconic accessory. Let’s learn how to make them!
Another way to incorporate the Toy Story theme into your cake is by creating a cake topper featuring Buzz Lightyear. You can make a miniature Buzz Lightyear figure out of fondant or use a toy figurine as a topper. This will add a playful and adventurous element to your cake design.
Additionally, you can use the colors of the Toy Story characters to create a vibrant and eye-catching cake. For example, you can use blue and purple frosting to represent Buzz Lightyear, or red and yellow frosting to represent Woody. You can also use fondant to create character faces or motifs, such as the Pizza Planet logo or the claw from the arcade game.
Gather all the necessary ingredients and tools
The first step in making these edible cowboy hats is to gather all the necessary ingredients and tools. You will need:
- Fondant in various colors (brown and red for the hat and white for the ball on top)
- Cornstarch or powdered sugar for dusting and rolling
- Rolling pin
- Round cookie cutter (2 1/2 inches in diameter)
- Small paintbrush
- Edible glue or water
- Wax paper or silicone mat for rolling out fondant
- Plastic wrap
Before you start making the cowboy hats, it’s important to ensure that your work surface is clean and dry. You can wipe it down with a damp cloth and then dry it with a clean towel. This will prevent any dust or debris from getting onto your fondant and ruining the final product.
Additionally, you may want to consider using gloves when handling the fondant. This will prevent any oils or dirt from your hands from getting onto the fondant and affecting the texture or color. If you don’t have gloves, you can wash your hands thoroughly and dry them well before starting the process.
Step-by-step instructions for making edible cowboy hats
Now that you have everything you need, let’s dive into the step-by-step instructions for making these adorable hats.
- First, knead the brown fondant until it is soft and pliable.
- Next, dust your work surface with cornstarch or powdered sugar, so the fondant doesn’t stick.
- Roll out the brown fondant to a thickness of about 1/8th of an inch.
- Use a round cookie cutter to cut out circles from the fondant. You will need one circle per cowboy hat.
- Place the circles in plastic wrap to keep them from drying out while you work on the top of the hat.
- Knead the red fondant and roll it out on a dusted surface to a thickness of about 1/8th of an inch.
- Use the same round cookie cutter to cut out smaller circles for the top of the hats.
- Bend the edges of the red circles slightly down to create the brim of the cowboy hat.
- Attach the red circles to the brown circles with edible glue or water. Make sure the red circle is centered on top of the brown circle, and the edges of the brown circle fold up around the edges of the red circle.
- With a small paintbrush, add a small amount of water or edible glue to the top center of the red circle.
- Roll a small piece of white fondant into a ball and place it in the center of the red circle. Gently press down to secure it to the hat.
- Let the hats dry overnight or for a few days to harden.
- Once completely hardened, the hats are ready to be placed on the cake!
If you want to add some extra flair to your cowboy hats, you can use edible food coloring to paint designs onto the hats. Use a small paintbrush and a steady hand to create intricate designs, such as paisley patterns or floral motifs.
Another fun idea is to make mini cowboy hats to use as cupcake toppers. Simply use a smaller cookie cutter to cut out the brown and red fondant circles, and follow the same steps to assemble the hats. Then, use a toothpick to attach the hats to the top of the cupcakes.
Tips for creating perfect cowboy hats
While making these hats, here are a few tips to help you create the perfect cowboy look:
- Use a circle cookie cutter that is slightly larger than your cupcakes or cake.
- For the brim of the hat, use the same cookie cutter for the red fondant as you did for the brown fondant, but just cut out a smaller circle.
- Use a small paintbrush to apply the edible glue or water.
- Place the hats on wax paper and let them dry in a cool, dry area away from any humidity or moisture.
- Store the hats in an airtight container until use.
Another tip for creating the perfect cowboy hat is to add some texture to the fondant. You can do this by using a toothpick or a small knife to create lines or indentations on the surface of the fondant. This will give the hat a more realistic look and feel.
Additionally, you can add some color to the hat by using food coloring or edible dust. You can mix different colors to create a unique shade that matches your theme or occasion. Just be sure to use a small amount at a time and mix it well to avoid any clumps or streaks.
Preparing the cake for decoration
Now that you’ve made your edible cowboy hats, it’s time to start decorating the cake! First, you’ll need to prepare the cake by baking your favorite flavor and letting it cool completely. Once it is cool, level it off by trimming any uneven edges or domes using a serrated knife. Spread a thin layer of frosting on the top and sides of the cake to create a crumb coat. Chill the cake for 15 minutes or until the frosting has hardened.
After the crumb coat has set, you can start adding your decorative frosting. Use a piping bag with a star tip to create swirls or rosettes on the top and sides of the cake. You can also add edible decorations such as sprinkles, fondant shapes, or fresh fruit. If you want to add a message or design, use a small round tip to pipe out your desired text or image. Once you’re finished decorating, chill the cake again for at least 30 minutes to set the frosting before serving.
Creating the base design for the cake
The base design of your Toy Story-themed cake can be as simple or as intricate as you like. You can choose to cover the entire cake in fondant, or you can leave it semi-naked or with buttercream frosting. Use blue frosting and add cloud shapes to resemble Andy’s wallpaper. You can also create a cake topper featuring the main characters, such as Woody, Buzz Lightyear, Bo Peep, and the Alien.
If you want to add more details to your cake, you can use edible markers to draw Andy’s name on the cake board or add small fondant decorations like stars, rockets, and spaceships. You can also create a 3D effect by adding fondant clouds or balloons on top of the cake.
For a more personalized touch, you can incorporate your child’s favorite Toy Story character or scene into the cake design. For example, you can make a cake that looks like the Pizza Planet truck or create a cake that features Jessie and Bullseye. The possibilities are endless, and you can let your creativity run wild!
Adding Toy Story-themed elements to the cake design
To add Toy Story-themed elements to the cake, think about incorporating elements from the movie, such as the famous green aliens, Mr. Potato Head, and the Pizza Planet logo. Use fondant or modeling chocolate to craft 3D sculptures of these characters or items to place on top of the cake or as part of the cake design itself.
Incorporating the edible cowboy hats into the cake decoration
You already know how to make the hats. Now, it’s time to incorporate them into the cake design itself! You can place the hats on top of frosted cupcakes or stick them onto the cake, either directly on top of the frosting or on a fondant-covered board that fits the theme of the cake. Use additional fondant or decorations to create a western-style scene around the hats.
Another way to incorporate the edible cowboy hats into the cake decoration is to use them as a border around the cake. You can place the hats around the perimeter of the cake, either on top of the frosting or on a fondant-covered board. This will create a unique and eye-catching design that will impress your guests.
If you want to take the cowboy theme even further, you can also add other western-inspired decorations to the cake. For example, you can use edible cactus plants, horseshoes, or cowboy boots to create a complete western scene. You can also use different shades of brown and green frosting to create a desert landscape around the hats.
Adding finishing touches to the cake design
After incorporating all the elements of the cake design, you can add additional finishing touches like edible glitter or food coloring to make the design sparkle. You can also add small lettering or messages on the cake to personalize it for the birthday boy or girl.
Another way to add finishing touches to the cake design is by using fondant or gum paste to create intricate decorations like flowers, leaves, or figurines. These decorations can be made ahead of time and then placed on the cake to give it a professional and polished look.
Finally, you can also consider adding a cake topper to the design. Cake toppers can be made from a variety of materials like plastic, wood, or metal and can feature anything from the age of the birthday person to their favorite cartoon character. A cake topper can be the perfect finishing touch to tie the whole cake design together.
Tips for storing and transporting a decorated cake
After completing your masterpiece, it’s important to take care when storing and transporting your cake. Refrigerate the cake in an airtight container until you are ready to transport it. Make sure to keep the cake level while transporting it, to avoid any damage to the cake and its decorations.
Conclusion and final thoughts on decorating a Toy Story-themed birthday cake with edible cowboy hats
Celebrating a birthday or any special occasion with a beautiful and delicious cake is always a great idea. But taking it one step further by incorporating a theme like Toy Story with edible cowboy hats is even more impressive. Follow the steps above and you’ll surely create a masterpiece that the birthday celebrant and guests will never forget!